Adding Ceph storage to my Proxmox cluster
I have been self-hosting workloads at home on a Proxmox cluster for many years now and of course, I have been backing up workloads I deemed important enough, using Bacula.
However, when I needed to run maintenance on one of the cluster’s node, migrating its Virtual Machines (VMs) to another node was taking a very long time to complete since some of my VM disks are quite voluminous.
Table of contents
Enter Ceph
Ceph is an open source software-defined storage solution and it is natively integrated in Proxmox. By hosting the VM disks on the distributed Ceph storage instead of a node-local LVM volume or ZFS pool, migrating VMs across Proxmox nodes essentially boils down to synchronizing the VM’s RAM across nodes, which takes a few seconds to complete on a 1 gbps network!
Minimally, all you need to do to start using Ceph is:
- Install a dedicated hard disk or solid state drive on each of your Proxmox nodes.
- Install Ceph on each node.
- Create the Object Storage Daemons (OSDs), Managers, Monitors, a pool and voila!
However, several important details can and will cause your Ceph storage to crawl at a snail’s pace.
My initial attempt with consumer drives
Most Ceph documentation, blog posts, etc. mention three important things to consider when building Ceph storage:
- Ensure your server has at least 1 GB of RAM for each terabyte of disk space allocated to your OSDs.
- Ensure the Ceph public/cluster networks use at least 10 gbps network interfaces.
- Ensure the drives associated with your OSDs are Enterprise drives.
I had plenty of RAM on all three servers and I purchased some used Mellanox ConnectX-3 cards on eBay for Ceph’s public network but for some reason, I decided to ignore the third recommendation and purchased the following SSDs:
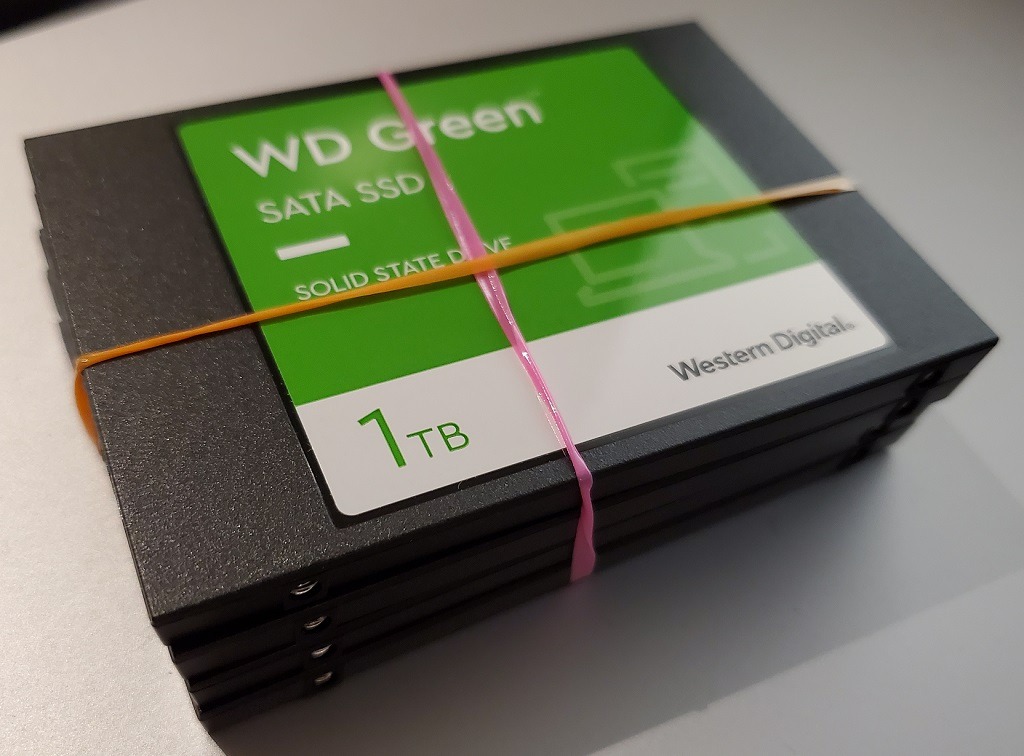
I purchased these Western Digital Green SATA SSDs very cheaply on Amazon and I was thinking to myself that any SSD must have overall faster read and write speeds than traditional hard disk drives. The plan was to add two of these drives in two of my Proxmox nodes whereas my third node already had two unused SAS 15K hard drives.
Very poor performance indeed
Well, it turns out that the cluster’s performance was abysmal. For a few seconds, Proxmox’s Ceph dashboard showed write speeds of around 20 MB/s but then they fell sharply to around 700 KB/s. Yes, kilobytes!
On the day-to-day basis, this still worked rather well since none of my workloads require much disk throughput. However, if one of my cluster’s nodes suffered an outage, Ceph would start to backfill the Placement Groups. As a result, any VMs with their OS disk hosted on the Ceph cluster became unresponsive, requiring up to 2 minutes for me to log into a Linux VM from the Proxmox console! All in all, this backfilling operation would take around 36 hours to complete if left unattended but fortunately, I usually found a way to ensure all 6 OSDs were in the up and in state, so that the backfill process reverted and took at most a few hours to complete.
During that time, if I needed one of my workloads to become responsive once again, I had to pause backfilling by setting the nobackfill OSD flag. I just had to remember to disable the flag to resume backfilling in order to get a healthy Ceph cluster and I would typically do this before going to bed.
Troubleshooting
Testing the performance of my VM’s rbd-backed disks was pretty straightforward: all I needed to do was to install fio, add another disk to the VM and run the following command to write 4k blocks for a total of 60 seconds:
WARNING: The following command will destroy filesystems on the selected disk!
# This command will destroy filesystems on the selected disk! Only run it on an empty disk!
fio --filename=/dev/new_disk_attached_to_your_vm --direct=1 --fsync=1 --rw=write --bs=4k --numjobs=8 --iodepth=1 --runtime=60 --time_based --group_reporting --name=4k-sync-write-8
As expected, fio typically showed an average write speed of around 5 MB/s and less than 100 IOPS so at this point I was wondering if Ceph’s data replication was causing such poor performance. Thus, I ran this command on the Proxmox server itself for one of the WD Green disk associated with one of the OSDs, which provided similar figures as within the VM.
I did this knowing that if the OSD became corrupted as a result of this command, I could simply delete the OSD, wipe the disk and recreate the OSD once again. This would have resulted in the cluster backfilling the disk with replicated data.
After executing the command, I saw no cluster health issues on the Ceph dashboard, which emboldened me to repeat it on another WD Green disk, yielding similar results. This showed that these figures are typical for WD Green drives. The dashboard was still showing a healthy cluster so I proceeded to run the command on one of my SAS 15K drives. This time around, the average write speed was hovering around 250 MB/s and IOPS were through the roof.
I definitely should have purchased enterprise-grade drives from the get go.
My Ceph cluster was irreparably damaged
Shortly after this troubleshooting session, the OSDs associated with the drives I ran the fio command on became corrupted and the service associated with these OSDs would not start anymore. I proceeded to delete and recreate these OSDs, one at a time, ensuring they fully backfilled before proceeding to recreate the next OSD. After all OSDs were back in the up and in state, a few PGs were in the incomplete state even after the recovery process was complete.
By this time, my cluster was in the HEALTH_WARN state and all I/Os to the VMs that were hosted on the cluster were blocked, rendering them unusable. This was very strange as I thought I/Os were blocked only when the cluster was in the HEALTH_ERR state.
I tried in vain to fix these incomplete PGs, but ultimately I proceeded to delete and recreate my vm-disk Ceph pool.
Thankfully, I had backups for most of these workloads and I was provisioning several of these VMs using Ansible playbooks, so I had completed a full recovery after two evenings worth of effort… However, I opted to restore my data on LVM-backed storage this time around and I stopped using Ceph storage until I was fully satisfied with its performance.
Hunting for enterprise-grade drives
A few days later, I found two second-hand 2TB WD Gold Enterprise Class SATA drives on eBay, as well as two second-hand 960 GB Samsung PM863a Enterprise SSD drives from a local supplier. I then proceeded to replace the WD Green drives with these new drives and what a difference this made!
Recovery/Rebalance now has a fairly consistent throughput of ~130 MiB/s:

During the backfilling process, the VMs are admittedly sluggish, but still usable. There is definitely no more need to set the nobackfill flag anymore. Manually setting one of my PM863a OSD in the out state will trigger the recovery process and the estimated time to complete is 23 minutes!
Conclusion
In hindsight, I regret not testing write performance on the enterprise drives prior to creating the OSDs because both the WD Gold and PM863a manufacturers advertise their drives as having write speeds well above the ~130 MiB/s I am currently seeing. These figures oddly match the throughput of a 1 gbps network card but I am certain that Ceph’s cluster_network and public_network, which are the same, are associated with the 10 gbps NICs. Furthermore, iperf3 testing on all combinations of the three 10 gbps NICs shows a consistent throughput well above 9 gbps.
Using second-hand drives is, in my opinion, quite acceptable considering Ceph’s default replication size of 3 and minimum size of 2. With a total of 256 PGs on the vm-disks pool, I’m fairly confident the cluster has sufficient redundancy for me to temporarily swap in one of the spare WD Green drives if one of the OSD drives were to fail.
I’ll just have to be very patient for the cluster’s status to become HEALTH_OK once again.